On the Rise(r)
At the end of the 2nd week I am gradually settling in on site. The pace is furious but that is probably because the project is nearing a milestone that is worth about $20m and without a big push it may be missed. To couple with that the next 2 weeks are short due to Easter so I don’t expect the pace to slacken much.
There has been a restructure of the project team since last post which has seen a split into North and South project teams. This has meant a move of offices but probably only for a while before we move again when the growing hospital superstructure expands into the space we are currently sitting.
It turns out that I have picked up responsibility for a stricken riser in the Central block that appears to have been passed from pillar to post by both management and contractors alike. I have inherited the task after its initial lift from pile caps to RL 6.2m but quality control seems to have been an issue. On first inspection it was clearly evident that not only was the reinforcement completely different to the schedule, but its placement within the walls was pretty poor. The cover ranges from 10-60mm and the surface finish (Australian Standard (AS) Class 3) is debatable, but due to continuation prior to resolution it would appear that a precedent has been set and parties agree to disagree.
I was due to monitor the 2nd pour by shadowing one of the lead project engineers but ended up managing it myself. I was quite reliant upon the contractors for information but very wary that they were only telling me what they wanted. The reinforcement continued to be an issue for the 2nd pour as it turned out it had been incorrectly scheduled by the reinforcement provider and due to time pressures the design was amended to use what was available. This actually increased the overall strength of the wall, but threw up issues with header beams above and below wall penetrations. Because the header beams were designed to fail in bending it meant that the shear reinforcement was greater. However by increasing the bending reinforcement meant increasing the shear reinforcement further which led to crowding of steel around the beams and a lot of awkward fixing to ensure room for the vibe which increased time delays. Due to the rush to complete this task I was left feeling like a young Troop Commander with a clearance certificate again cutting about site to get the required contractor signatures to certify their work before the concrete could be called forward.
The pour appeared to go well from my amateur perspective, but after the shuttering was removed it looks pretty poor. There are a couple of small areas where the concrete hasn’t quite reached on the underside of voids and a couple of corners that appear to have honeycombed somewhat (potentially a leak in the formwork).
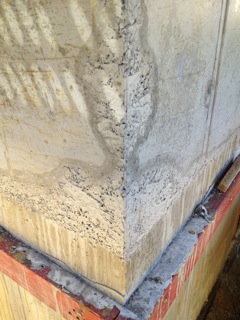
honeycombing at base of pour
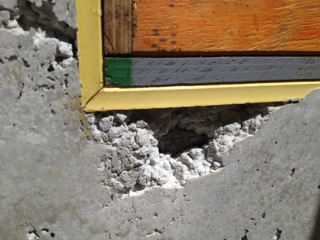
poor access for concrete flow
One thing I should definitely picked up on was the starter bars to the next level. Although this lift will be capped by a slab and the subsequent lift will then tie in after it has been cast, there are sections of the next lift where door voids are designed. By dealing with the lower lift in isolation I didn’t check the reinforcement plan for the upper lift and should have noticed that the reinforcement should have been closed off. As it stands now there is only a very short length of reinforcement at the top that will be enclosed by the slab. This is not a huge issue as the slab reinforcement can be amended to accommodate this oversight, however it does highlight to me how looking at the bigger picture will save time in the future. I should have ownership of the next lift from the start and will be able to manage it to completion with the correct Reo, and correct starts for the next lift.
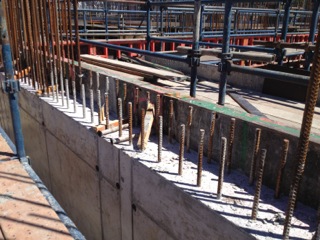
stubby starters
I am now looking at column and wall pours in the South Block from the upper car park level to ground level. In an attempt to make up some time it was suggested that the columns and ramp walls should be poured as one unit. I agree that this would save time in pouring, but after the issues with reinforcement fixing that I experienced with Riser 1, think that the additional effort of getting the whole thing formed and fixed could take longer than expected. The other option is to use couplers embedded into the columns and pour a more simple, un-structural flat wall at a later date. I will be looking into this next week.
My objective for this week is to get my head fully into the contracts. I have booked a meeting with the project commercial director to do this

So many reasons why you might get bleeds and honeycombing…. Not sure there is AN answer…..I understand that good concreters listen to the poker tone…. but buggered I’d know what the difference was….so I’ll stick to the obvious….Your wall starters are generally the compression lap length plus kicker – around 50dia…yep they sure look stubby.
I was actually wandering around the base of a heavily congested core shutters this morning whilst pouring with a block of wood doing the bang test to see if it sounded hollow. It’s getting a bit technical for me!
As for listening to the poker tone i don’t think they heard it this morning as it was rattling off of the reo and shutters.
Only 20dia reo, but still pretty stumpy. Discussing solutions with the Structural engineers on wed. Current options: 1. Tie into lower Horizontal Slab Reo. 2. Weld cut Ubars on (though lap length is lacking). 3. Drill and epoxy ubars in (still not closed loop though). 4. Do nothing.
I think as there is a void above the slab at that point, it helps but not much.
Nothing a couple of bags of Polyfilla couldn’t sort out.
Hi Nik,
Great mixed bag of issues all in one hit! The variation in reinforcement is definitely one for reference back to the design team – remembering that load goes to stiffness you’ll be aware that a change in reinforcement could change the stressess elsewhere. Although you could look at this and probably decide if it matters or not, you don’t want to carry the PI risk for it.
The 10-60mm of cover is clearly another one to check the basis of the design: Is it necessary for durability or fire? If its durability it might benecessary either to break out locally and replace the covering concrete with a waterproof or epoxy based product, if it’s fire then there might be issues with either replacing with a more dense material or increasing the cover. Or the client can accept that there is a risk he shouldn’t need to carry and charge accordingly… The honey combing and grout leaching is a simple break out locally and make good – Jim’s Polyfiller is not far short of the mark.
The increase in steel to suit ‘what was available’ was presumably completed by the design team not your delivery team? The fact that it increases the bending stength of your elements and might therfore change the failure mode need not be an issue as long as the serviceablility is not reduced and the ultimate capacity is increased without introducing catastrophic failutre or unacceptable load transfers. Again this is not outwith your abiility to assess in order to decide wheather you want to press on becasue you think it will be OK, or await the instruction to strip back and remediate if you are confident that will be required. As you know, the formal decision is one to refer to those with the responsibility, liability & insurance for doing sombut it’s a good thing to know in advance what they should say in response.
As John says, your starters look short! I’m guessing they’ve been cut off at slab depth less cover and you now need to terminate them. The easiest is actually to cut them shorter to accomodate a bend radius in a bar coupled to them and them couple on a curtailment bar. Somehow I suspect that the Ausies way will be just to weld (noting of course that if you heat high yiield steel up too much it will revert to mild steel). What was the outcome of the Wednesday meeting?
Looks like there is an amount of investigation you will need to do to ensure that these problems are all removed or reduced and remediated on the south block walls and columns which suggests options for a TMR…
Nice photo and useful blog – thanks! all the best,
Richard.