What’s wrong with this concrete?
A RC beam for a radial arm coal stacker was recently completed on site as part of a £2M variation order to the original contract. The beam effectively supports a radial arm connected to a conveyor that will distribute coal evenly onto the newly created coal yard slab.
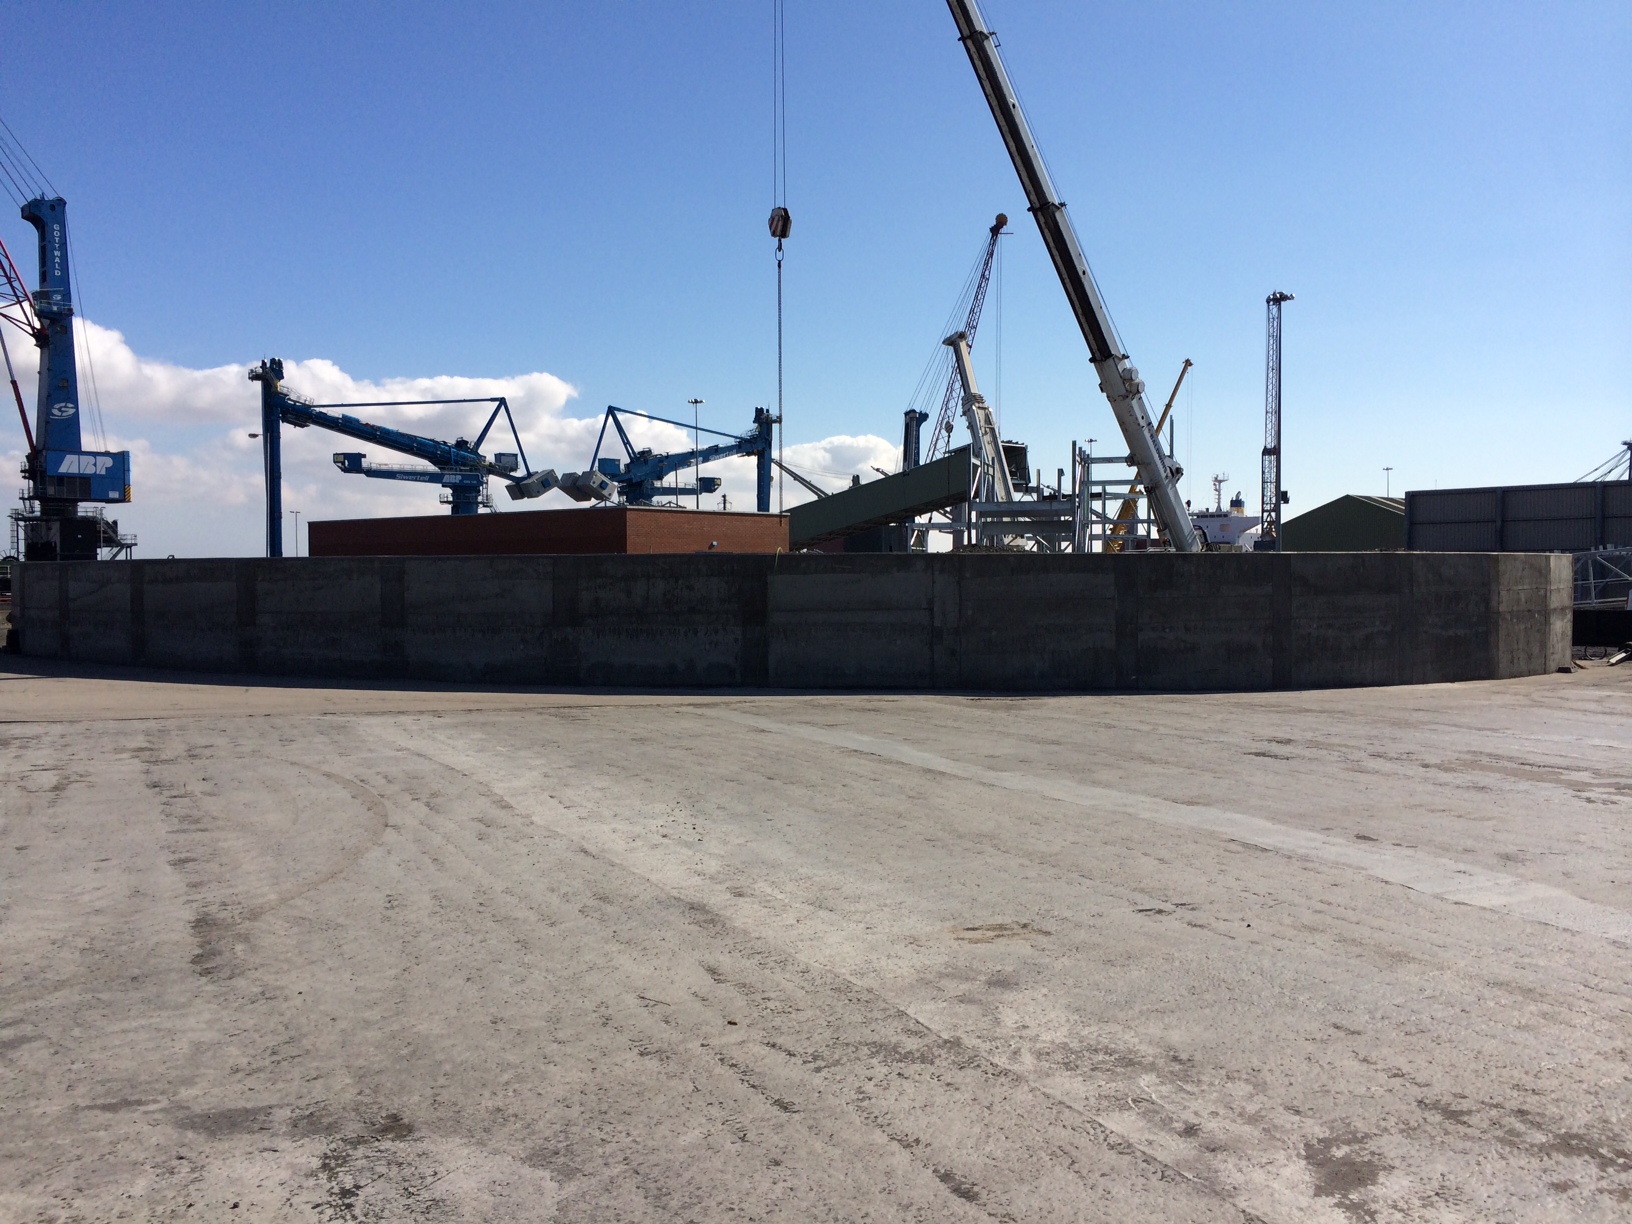
Radial beam for coal yard stacking arm.
The stepped design allows the radial arm to move laterally and distribute the coal. The top concrete surface on the main running section of the radial beam has a series of small cracks tracing the position of the rebar and depressions inbetween as seen in the following photos.

Radial beam top surface.
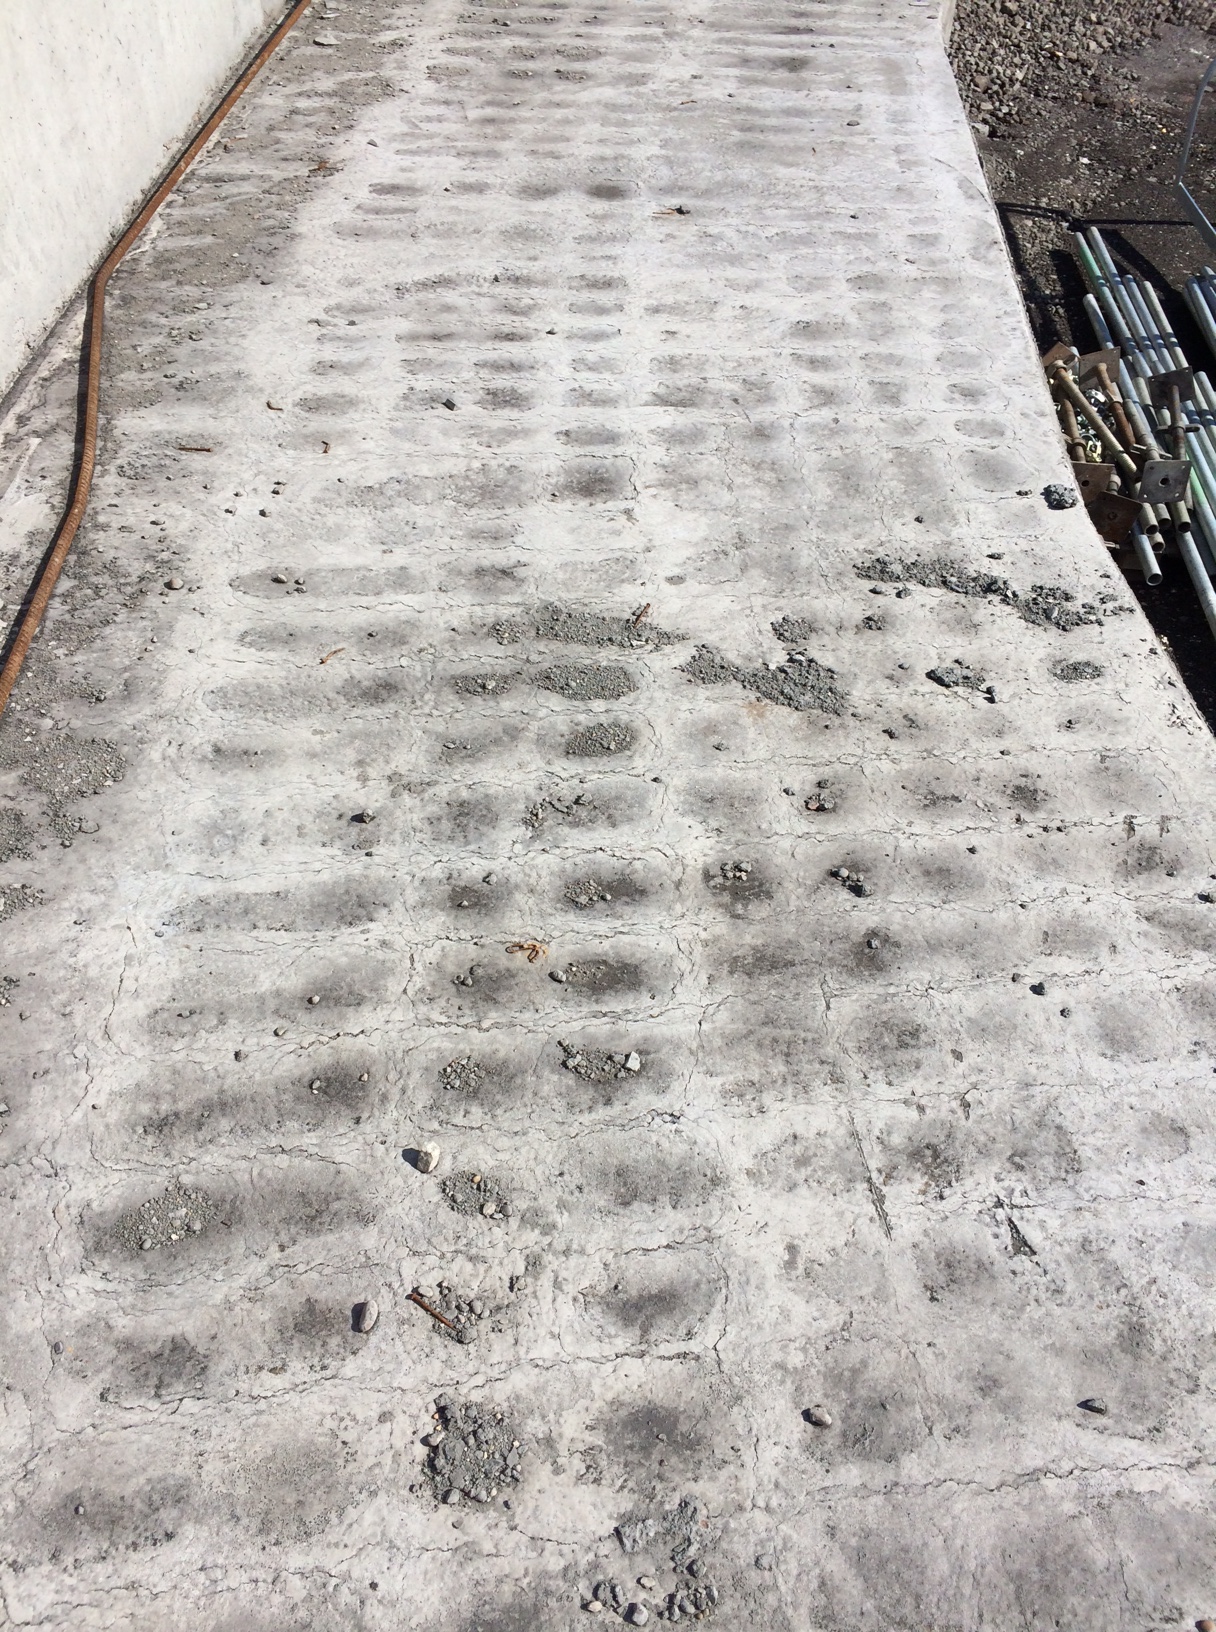
Radial beam top surface in detail.
This has occurred previously across the site (although not as severe) and seems to happen when there is a large volume of concrete poured into reasonably congested rebar.
My initial assumption was that the vertical cover was insufficient (specified 50mm) and the top reinforcement was too close to the surface of the concrete. However I saw the cover being checked prior to the pour and know that it was closer to 60mm than 50mm in most areas.
My next hypothesis was that the concrete was over vibrated creating the problem of segregation where the denser aggregates settle to the bottom while the lighter cement paste tends to move upwards allowing the lattice pattern of the rebar to be seen. This would be further accentuated by the practice of wetting up the concrete pre-pour as I have highlighted on previous blogs.
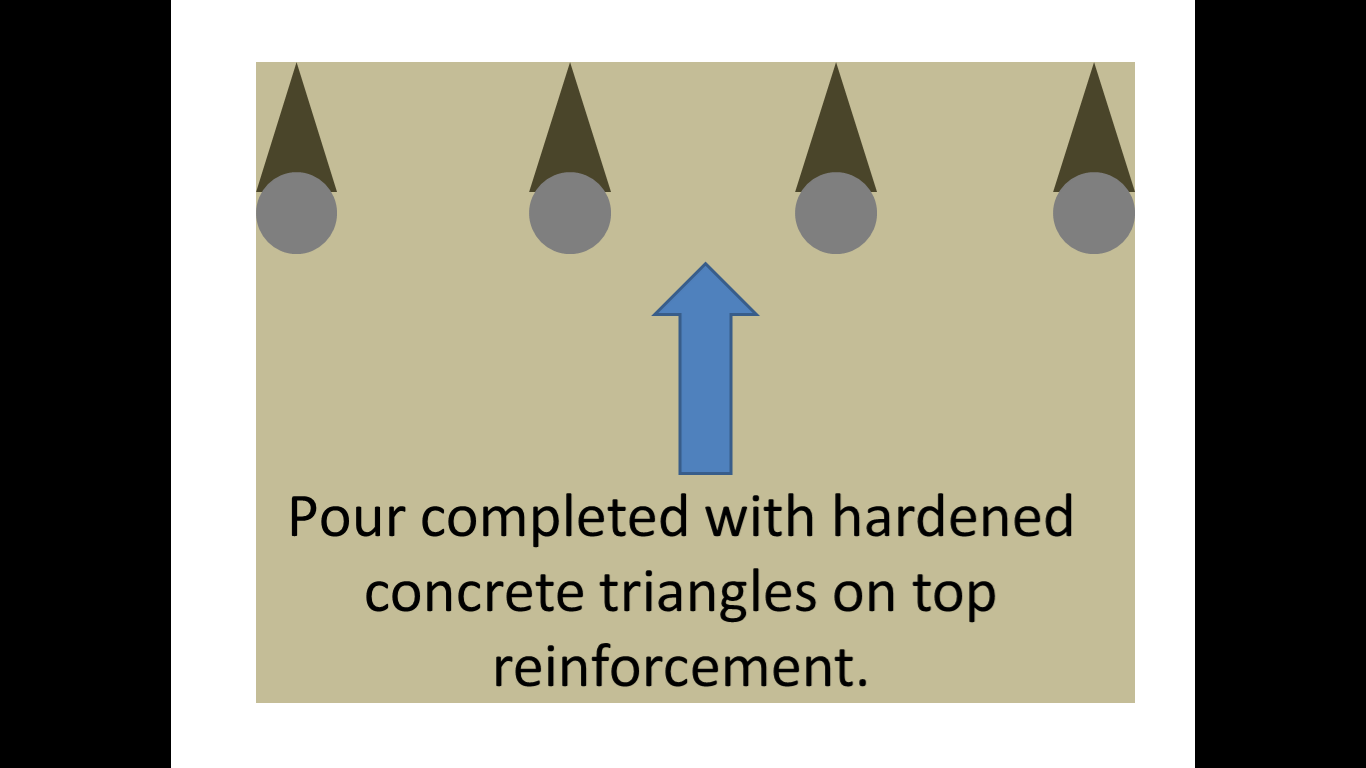
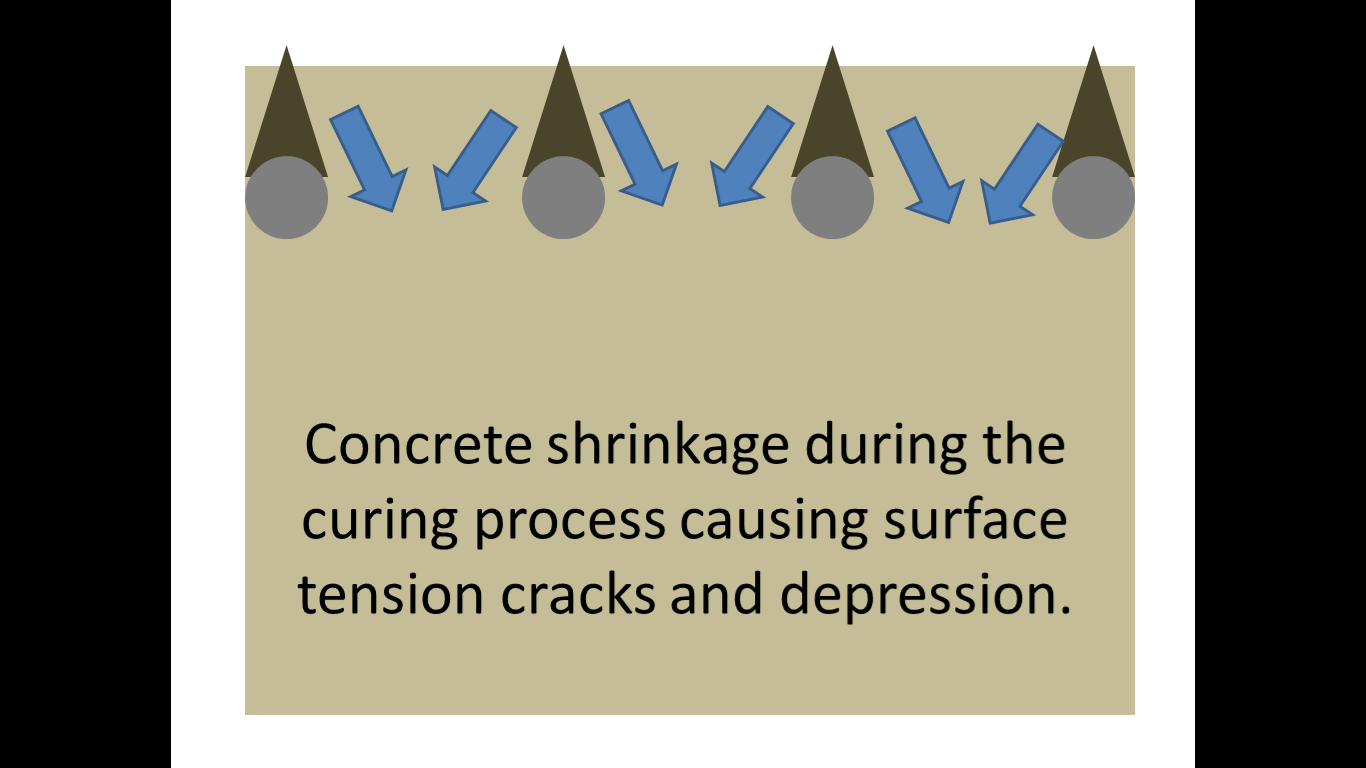
After further thought and reflection after watching the pour I had another theory and have put together a couple of slides to try and explain what I thought was happening. My theory had been that due to the depth of the pour (>2m) concrete was hardening on the top layer of reinforcing bar as it was splashed over it by the pump during the initial stages of the pour. If this was not cleared away it would create an area of hardened concrete above the top rebar that would eventually be covered during the final stages of the pour. As the concrete shrinks during the curing process it would arch over these small triangles of hardened concrete on top of the rebar, creating a surface tension and the eventual cracking and apparent depressions in-between the rebar. I know this was the case in certain areas as I spoke to the engineer in charge and he had to instructed the concreters mid pour to start cleaning off the top rebar as the pour continued due to bad practice from the sub-contractor.
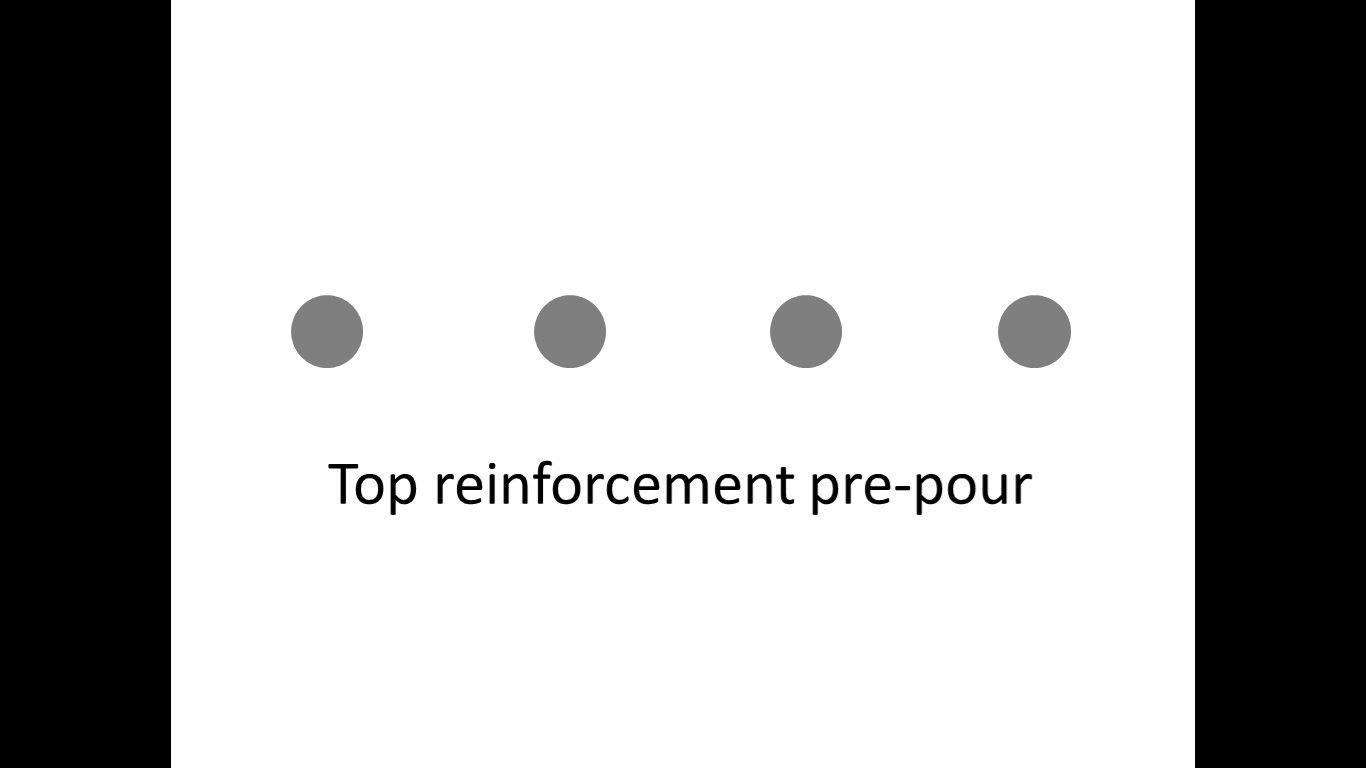
Stage 1.
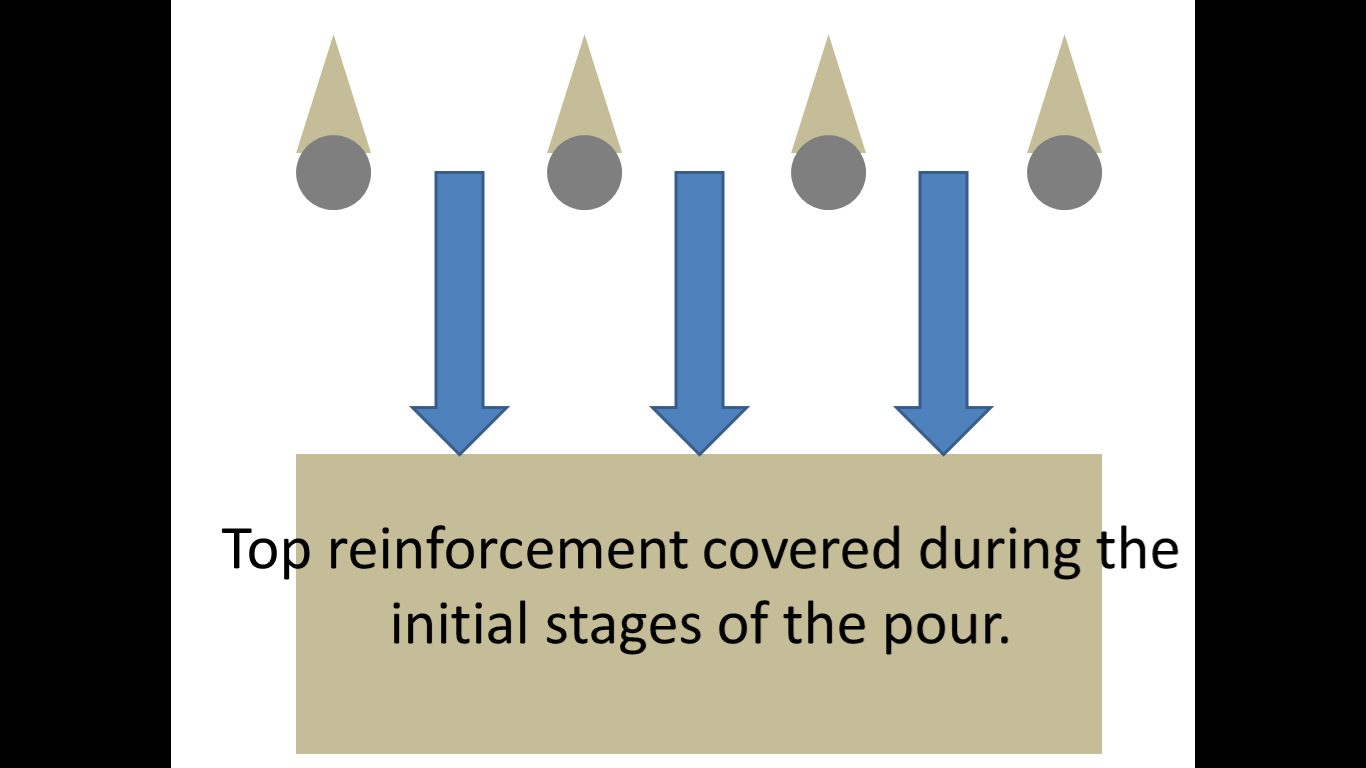
Stage 2.
Stage 3.
Stage 4.
However I have done some more detailed research and believe that the problem may be plastic settlement cracking. I found the following diagram on the concrete society website.
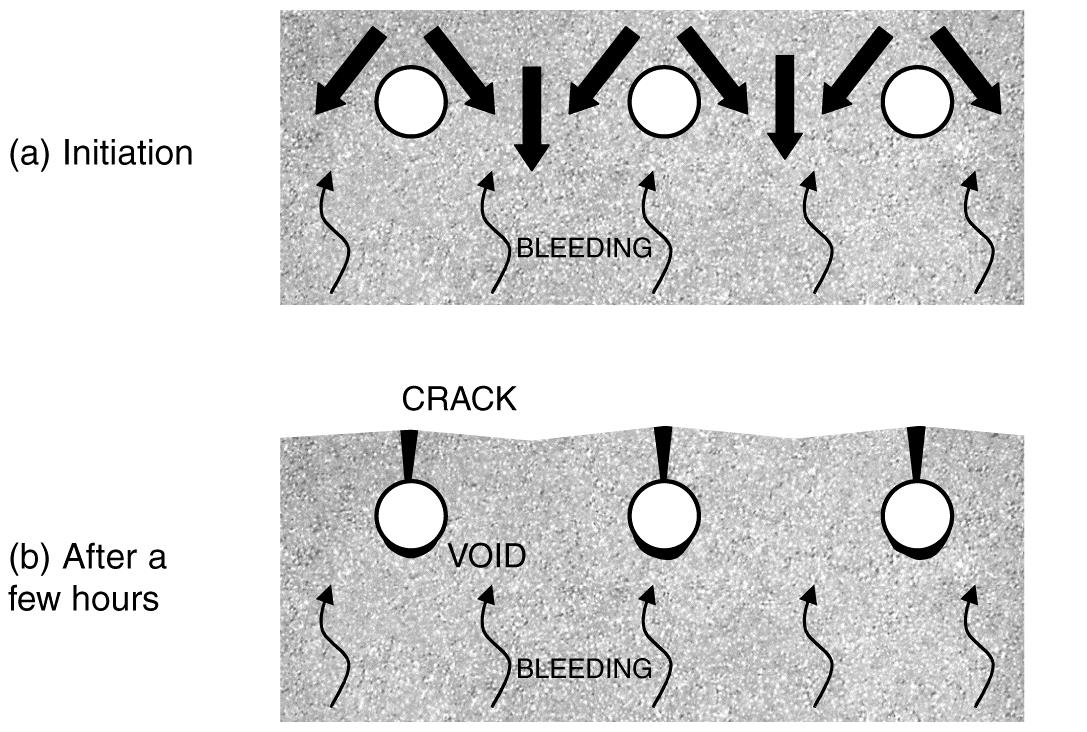
Plastic settlement cracking.
This suggests that the cracks could be caused when the settlement of fresh concrete is restrained by the reinforcement. Plastic settlement cracks can form in young concrete, within the first few hours after placing. As water moves upward through the mixture, the denser constituents move downward accentuated by any over-vibration. This downward movement may be obstructed by the top layer of reinforcement.
The plastic concrete may arch over the top of individual reinforcing bars, bringing the surface into tension. Cracks may develop at regular spacing and usually follow the line of the uppermost bars, giving a series of parallel cracks; there may also be shorter cracks at right angles over the bars running in the opposite direction as seen on the radial beam.
It is sometimes possible for plastic settlement cracks to form on a vertical face where reinforcement has restricted the free flow of concrete within the formwork. In such cases it is possible that the cracks are formed between the lines of the reinforcement.
The concrete can also be supported by the shuttering, causing restraint to the concrete in connected members. This typically happens at mushroom-heads on columns but can also occur at other locations, such as under spacer blocks. Cracks at mushroom heads of columns are generally horizontal. They are also typically 1 mm wide and can cross the full section.
So in conclusion I now believe that a combination of these factors have led to the formation of the cracks.
The radial beam was made up of large (22mm) diameter rebar along the top layer and was reasonably congested (top rebar and links at approx. 150mm spacing). The C32/40 concrete is made using 20mm aggregate and has a slump of consistence S3 100-150mm for use with the pump but is often wetted up even more prior to pouring. The concrete was pumped into place and there was no doubt that some was left on the top rebar due to splashing over it and not cleaned off. It would all be furthered by the tendency to over vibrate during the pour due to the volume.
So what’s the remedial action?
I believe the client is currently unaware of the finish as the beam has been completed well ahead of schedule. This means that remedial action can take place. It is likely that the top layer will be removed by high pressure water (hydro-blasting) down to the top layer of rebar before the surface is re-applied and finished correctly. Contractually I am unsure of where the liability currently lies, I suspect with the concrete subcontractor but I will try and dig into the subcontract to find out.
Why am I concerned?
The reason I have investigated this particular issue, that is outside of my section and responsibility, is 2-fold. Firstly it has happened on site before, including the previous sub-station ground slab and although it was not as severe when I enquired as to why it was occurring, no-one offered a solution.
Secondly, and most importantly, as I am likely to be building a significantly larger substation I do not want the same to happen to the slab I will be required to pour. Therefore any mitigation measures I can take during the pour will hopefully limit my blushes.
So what’s the preventative action?
The tendency for plastic settlement cracks to form may be reduced by adjusting the concrete mix, for example by avoiding gap-graded fine aggregate and reducing the water content, and by appropriate workmanship and control of vibration. Particular care will be required for tall elements especially the 2m+ concrete cable pits required in the sub-station base. In some cases, plastic settlement cracks can be eliminated, rather than prevented, by careful re-vibration of the concrete after they have formed. However, it is important to ensure that the concrete is not over-vibrated as may have been the case in the radial beam.
Are my conclusions correct? Thoughts???

Hey mate
Intersting stuff that has given me some thoughts for a few problems that we are having at this end.
Ive been wrestling with concrete trials for new mixes over the past few weeks, whilst concurrently working up to a couple of large slab pours which happened over the last few days…based on that…
I think the plastic settlement cracking sounds sensible, but perhaps for a different reason than the segregation that you imply. You don’t mention how the concrete was cured? It could be that the concrete surface has formed a plastic skin as it cures quicker than the main body. As the main body cures and shrinks, the ‘skin’ is then contracted around the rebar.
What is your specified maximum dry shrinkage figure? The Crossrail spec is <0.03% @28days. You say that the mix was wetted up before being placed, which will increase your water/cement ratio, and increase this drying shrinkage, exacerbating your problem. Might be worth getting some cores of the radial beam to test at 28days. If your spec allows you to use it, I've been using Adocure WW as a curing agent which seems to be doing the trick.
Air entrapment. Ive had dramas with a trial mix that has failed against its specified density. Through investigation and retrialling, I've found it turns out to be the particular brand of polyfibre that was entrapping air. Through the course of trying to resolve this, I discovered 'defoaming' agents which release this air. A cupful of this stuff in m3 of mix reduced the air content from 5-6% to about 1-2%. Perhaps a reduction in air content in your mix may reduce the volume change during curing?
Looking at the photos, it seems that it is something sytemic, related to the way the mix is performing chemically and/or physically, as opposed to workmanship. The concrete splashed on the rebar would give you something a bit more random, and the 20mm agg with 150mm spaced rebar isnt too congested…thats what we've got here without issue.
Remedial Action. Having just discovered a 70mm discrepancy in the as built surface layer on one of my adjoining pads, I'm looking at this today. If you are recasting you will need to go back at least 150mm…anything less than that will debond and crack up…like when I cracked up in Ex COFFER!
Good luck mucker!
Nice! Great piece Joe and thoughtful comment from Ryan – what is going on??! I think that you’ve just about bottomed out the issue betwixed and between which is that this is clearly a property of the geonmetry and the concrete mix, placement and curing rather than a random workmanship issue. The issue is one of shrinkage which you will recall comes principally in three flavours: Thermal, Plastic and Creep, the first two of which are in play here. Ryan is spot on with his remark about looking at the mix design and worrying about wetting up – a terrible malpractice that should never be condoned (although there is a permissible additional water limit that can be used if necessary this is not he same thing!). A high volume ppour will develop significant temperatures internally which then lead to contraction towards the centree on cooling. This alone would give the issue that is well illustrated in these photos. Add additional water and poor curing practice and you have a sure fire recipe for disaster. That no one on site can think of a reson this might happen suggests that are dangerous near concrete and probably hard to describe as competent; there is so much going on that it would be hard not to walk into it by accident!
Remedial for that which has already been poured – check that it is within spec if not work out if it remains acceptable (reduced performance limit?) or needs to come out! If it can be accepted than you’re into making good and that means cutting back to a sound surface and repairing – repair mortar will bond more redily but I looks like it’s a bit bigger than that so you might need to abrade and recast the surface.
Future pours – get the designer involved – it’s a CDM desigers risk area and they should have dealt with the mix design, thermal shrinkge and early age cracking. From the site side there is a need to watch for pour rate, compaction and curing. Loads of good guides in IHS from the concrete society if you want a read…
It would be nice to know what Pete’s getting in terms of shrikage on his high volume pours…
Thanks for your comments.
Ryan, The curing procedure on this particular pour was something that I didn’t see. On the smaller pours very little in the way of curing practice other than spraying water onto the surface is used. On the larger pours a curing agent is applied to the surface similar to the Adocure you mention. (cannot remember the name) I will try and investigate the shrinkage figure (not on the designers specification) and air entrapment agent as you suggest.
Richard,
I agree that the thermal shrinkage component is another significant contributing factor The other large volume pours where this has occurred are mainly slabs, where the depth is not so great and thus the rebar ‘pattern’ whilst present is much less pronounced. I think a look into all the areas discussed should allow me to mitigate the risk during my sub station pours, the driver for my blog.
Watch this space for the remedial action.
Joe, as and when you find out, do publish the volume limits – I’d be interested to know. I was curious as to your first assumption regarding build up of hardened concrete on top of rebar as surely this would have been time dependent. Was this not done in one pour? If it was done in one, how was there enough time for concrete to harden up on rebar to cause such a major issue? If not in one pour, then what limitation were set on heights.
No problem, I will publish details as soon as I can dig the info out. The radial beam was poured in 2 halves. Each half was poured to stage one ie to the running surface of the radial stacker seen in picture 2 with the latticing, with starter bars in position to subsequently erect the steel and pour stage 2 – the smaller guide wall along the top of the beam. This was then repeated for the second section. I seem to remember that the largest pour in one go was about 200m3 and I know that it took most of the day to complete, in part down to the batching plant.
My hardening concrete theory was just me bouncing around an idea that I had on watching the pour. Mainly due to the guys having to brush off the concrete from the top rebar as it was poured. As I say in the blog I went on to do some more detailed research via the concrete society and whilst it may add a very small component to the plastic settlement cracking, I agree that it is not the main contributing factor.
This might be going on a bit of a tangent, Ryan have you looked at using bonding agents to reduce the depth you need to go down for your remedial works. I’ve had to repair some pedestals that were damaged and also a column. After ensuring the surface is scabbled we then used nitobond EP for one and Sikadur 32 for the other. They are both 2 part epoxy adhesives designed for bonding fresh concrete to existing concrete. You could also look at drilling and casting in some small sections of reinforcement to give an even firmer grip. If I find the time I’ll maybe throw some pictures up of the recent repairs.
Richard, we’ve got fairly strict curing controls on our main structural elements and so far haven’t seen any thermal cracking. Annoyingly there do appear to have been some cracks starting to appear on the pedestals (which have less controls due to the smaller volume).
Joe, another thing to watch with the concrete starting to harden on the top bars is using the vibrator whips to clear the concrete off. In a large pour with multiple layers this can lead to voids in the lower layers around the reinforcement if they have started to go off. This may not be an issue depending on what your pour plan is.
Looks like plastic settlement cracking.. the advice is:
Reduce water content;
check sand gradingand reduce content;
do not place in coldweather;
reduce evaporation from top surface;
revibrate top after 0.5 to 2 hours.
Increase cover to reinforcement.
Joe and Team – outstanding blog, well done!